11 Preferences
Preferences are for setting defaults for some GrafEq features, behaviour and
appearances. Some advanced features are only accessible or controlable from
within the preferences window. The preferences window can be opened by selecting
Preferences from the
File menu.
Figure 11.1 shows the preferences window as it appears when the program is installed for the first time;
preferences are organized mainly by windows, while a few general preferences for file access
control and interface languages are also provided.
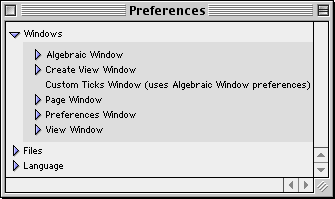
Figure 11.1: The GrafEq preferences window
Before going into details about preferences, following are some general hints
about the effects of preference settings and some general use instructions:
- Most preference settings take effect immediately, but to change the language
used for the interface, you must quit and restart GrafEq.
- Preferences are generally inherited by the next use of the program - thus enabling the
user to continue on in the same environment as was most recently used.
- To make a selection from a pop-up menu, first click on the menu
title. After the menu has popped up, you can then select an item from the menu.
- Some preference controls are offered in lists, as in the Ticks
Defaults preferences.
Lists have the following general properties:
- Lists can be toggled between an expanded and a collapsed state by
clicking on the name of the list or
on the triangular arrow adjacent to it.
- Expanded lists reveal their respective list elements and/or sub-lists.
Revealed list elements can then be customized individually, and sub-lists can
then be expanded or collapsed.
The same rules that apply to lists also apply to sub-lists.
- Some lists also come with checkboxes adjacent to their
respective triangular arrows.
(Most lists in the Ticks Defaults preferences have them.)
The list box can be checked or unchecked to
conveniently, and collectively, select or deselect all
element options covered by the list.
| Hint: | A list which has both selected and unselected elements
displays a horizontal bar in its checkbox. |
|
11.1 Windows Preferences
Windows are listed in alphabetical order of window names, as seen in figure 11.1 earlier.
Algebraic Window Preferences
| Hint: | Algebraic window preferences also control the custom ticks window settings. |
|
Controls cover the clipboard, easy buttons, display fields, and the teleprompter.
Figure 11.2 shows algebraic window preferences:
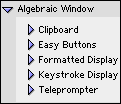
Figure 11.2: Algebraic window preferences
- Algebraic Window - Clipboard
Clipboard Preferences are for setting appearances and
formats to be used when exporting from GrafEq’s algebraic windows
to the clipboard. Figure 11.3 shows clipboard preferences:
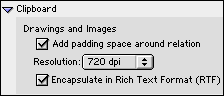
Figure 11.3: Algebraic window clipboard preferences
- Add padding space around relation checkbox
Check the option if it enhances layout appearance when relations are pasted
to a word processing document.
- Resolution select low resolutions to save memory or disk space.
Select higher resolutions for smoother and clearer bitmaps.
- Encapsulate in Rich Text Format (RTF) Often convenient for pasting
a relation into a word processor.
- Algebraic Window - Easy Buttons
Easy buttons preferences are for setting defaults to show, or not show,
the easy button floating window; and setting access to each easy button group.
Figure 11.4 shows easy buttons preferences:

Figure 11.4: Algebraic window easy buttons preferences
-
-
Select the respective Available checkboxes to
display the headings of desired easy button groups;
- Algebraic Window - Formatted Display
Formatted display preferences are for setting font type, default font size, and
appearances of entries in the algebraic window’s
constraint field(s).
Figure 11.5 shows formatted display preferences:
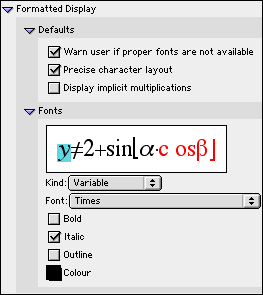
Figure 11.5: Algebraic window formatted display preferences
- Defaults list
- On startup, warn user if proper fonts are not available checkbox
Select this option to warn user every time GrafEq starts up if
proper fonts are not available.
- Precise character layout checkbox
- Display implicit multiplications checkbox
- Fonts option list
| Tip: |
- Symbol character kinds, for both formatted and
unformatted sections, should use symbol font only.
- Experiment with the various options and see the effects.
|
|
- Algebraic Window - Keystroke Display
| Hint: | As of GrafEq version 2.04, keystroke information is available directly from
the constraint field, by positioning the cursor to the left of the entries.
The keystroke field remains useful for printing purposes, but
has been set to be hidden by default preference settings. |
|
Keystroke display preferences is for setting to show, or not show the keystroke field
(which would be a strip field beneath the current constraint field),
and setting font type, and appearances of entries in the
keystroke field. Figure 11.6 shows keystroke display preferences:
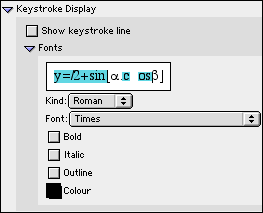
Figure 11.6: Algebraic window keystroke display preferences
- Show keystroke line checkbox
Select this option to show the keystroke line
when a constraint is being entered or edited.
- Fonts option list
Fonts options are essentially identical to those for the formatted display,
except that these options apply to entries to the keystroke display field.
- Algebraic Window - Teleprompter
The teleprompter preference is for toggling to show, or not show the
teleprompter (which would be the user hint shown at the bottom of an active
constraint field). There is just one preference option, provided
by the Show teleprompter checkbox.
Figure 11.7 shows the teleprompter preference:
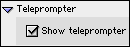
Figure 11.7: Algebraic window teleprompter preferences
Create View Window Preferences
Create view window preferences are for setting default options covering automatic graphing,
colour view and view size, and interface options covering user access to these
create view settings and controls.
Figure 11.8 shows create view window preferences:
Figure 11.8: Create View Window preferences
- Defaults list:
- Start graphing immediately checkbox
Select this option for automatic graphing when a new view is opened.
De-select this option and graphing in a view window has to be activated by
selecting the Graph checkbox in the view window’s parameter bar.
- Display views in colour, if possible checkbox
De-select this option to display graph views in black and white, which
might be desired such as in printing.
- View size:... pop-up menu
Selectable view sizes are relative to the monitor size.
- Perturb bounds checkbox
Select this option to enlarge bounds by about
0.01% of the view size every time a new view created, so that
graphed lines will always have uniform thickness
(because lines like x=0 will fall upon a column or
row of pixels rather than in between two columns or rows).
| Hint: | Defaults apply to all create view windows.
Settings for individual create view windows can be changed
from within that create view window
if either of the interface options, described in the following section, are selected.
|
|
- Interface options list:
- Provide "More/Fewer Options..." button checkbox
Select this option to provide a "More/Fewer Options..." button at the bottom
center of each create view window. The button
allows view creation options to be displayed or hidden anytime from
within the create view window. Displayed options can then be
customized for the current view creation.
| Hint: | When create view options are hidden, the button would be
labelled More Options and is for revealing the options;
When create view options are shown, the button would be
labelled Fewer Options and is for simplifying or minimizing
the create view window. |
|
- Show view creation options checkbox
Select this option to show the individual create view options.
| Hint: | The setting of this option solely determines the accessibility of
view creation options if the "More/Fewer Options..." button is
not provided within the create view window. |
|
Custom Ticks Window Preferences
Custom Ticks Window uses the same preference settings as the algebraic window.
Page Window Preferences
Page window preferences are for setting the frequency at which page window contents
are to be updated from any graph views, and setting font size for the page window to suit
printing needs. Figure 11.9 shows page window preferences:
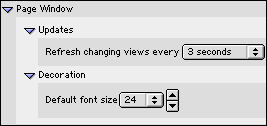
Figure 11.9: Page window preferences
- Updates preference is provided
by the Update from view window every... time interval pop-up menu.
- Decoration preference is provided by the default font size pop-up menu.
| Tip: | The page window might flash when it is updated; the advantage of showing
current contents should be weighted against possible flashing of the display. |
|
Preferences Window Preferences
Preferences window preferences are for controlling access to preferences settings, and
saving of preference changes.
Figure 11.10 shows preferences window preferences:
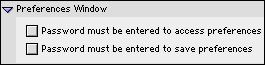
Figure 11.10: Preferences window preferences
- Password must be entered to access preferences checkbox
Select this option to restrict any access to the preferences window and settings.
- Password must be entered to save preferences checkbox
Select this option to restrict changes to the preferences file;
if the preferences window is accessible, preferences can be changed for
the current GrafEq session, but saving of the changes is restricted by password.
| Hint: | The same password will be used for restricting access to preference settings and
saving, as well as access to file loading and saving. A user specific password
is supplied with registration. |
|
View Window Preferences
View Window - Information
Information preferences are for setting updating frequency, and optional
displayed data items for the view window’s information view buddy.
Figure 11.11 shows information preferences:
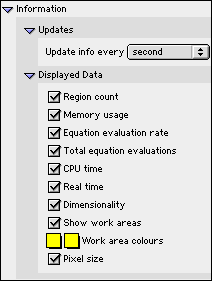
Figure 11.11: View window information preferences
- Updates - Update info every... time interval pop-up menu
Select a rate just frequent enough to display reasonably timely information,
because fast changing data can be hard to read.
GrafEq constantly monitors memory conditions anyway.
- Displayed Data list:
- Region count checkbox
- Memory usage checkbox
- Equation Evaluation Rate checkbox
- Total Equation Evaluations checkbox
- CPU time checkbox
- Real time checkbox
- Dimensionality checkbox
- Show work areas checkbox
- Work area colours colour pop-up menus
- Pixel size checkbox
All the data options are selected by default preferences.
Refer to the The View Buddy Floating Windows chapter for detailed meaning and useful application of
information buddy’s displayed data.
11.2 Files Preferences
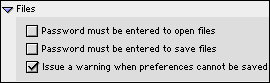
Figure 11.12: Files preferences
Files preferences are for controlling access to file loading and saving/changing, by the
Password required for opening files checkbox and
Password required for saving files checkbox.
| Hint: | The same password will be used for controlling access to preference settings and
saving, as well as access to file loading and saving. A user specific password
is supplied with registration. |
|
11.3 Language Preference
The language preferences allow you to select which language is used for GrafEq’s interface.
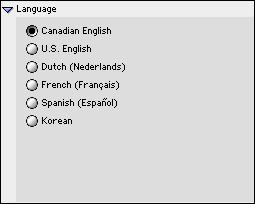
Figure 11.13: Language preferences
Conclusion
To conclude this chapter of the manual, remember that
default preference means that the settings will apply to all appropriate cases,
and across sessions, every time GrafEq is started.
These settings can be changed on the fly, when GrafEq is running, but the changes
will apply only to individual graphs or windows, and will
not affect the defaults. The next time GrafEq is started, default settings
would be back in effect.