C Draw Tools
Draw tools lets you add labels, explanations, descriptions, and drawings to
graph views and pages for printing out. For pages, the tools are accessible from the page buddy window.
For graph views, the tools can be brought up in the view buddy window
by clicking on the buddy mode pop-up (at the top of the floating window) menu
and selecting
Draw from the pop-up menu.
Draw tools include
- a selection tool, for selecting objects;
- an arrow tool, for drawing arrows and lines;
- a box tool, for drawing rectangular boxes;
- a text tool, for writing text annotations; and
- a formula tool, for writing mathematical formulas.
The active draw tool is selected by clicking on a tool
button in the draw buddy window or the page buddy window.
The respective draw tool options and controls are then presented
in a separate
Draw Tools floating window.
If an object was just created or is otherwise selected, the tool’s controls will modify that
object only. If no object is selected, a tool’s controls will modify
the default settings for that tool—which affect all objects subsequently created.
C.1 The Selection Tool
The selection tool is for selecting an object which can then be
moved, edited, or deleted. It is the black cursor button in
the draw buddy or the page buddy.
- At most one object can be selected at a time.
- To select a new object, first ensure that the selection button
in the draw buddy or page buddy is pressed down. Then click on a
new object to select it.
Selection is possible when the cursor appears as a hand with a pointing finger.
- When an object is selected, a Draw Tools floating window which is
associated with the type of the selected object will appear automatically.
The selected object can then be edited using the relevant tools provided in
that Draw Tools floating window.
For details about a particular draw tool’s controls, refer to the section in the manual for that tool.
- If no object is selected, no Draw Tools floating window
will be displayed.
- With the selection tool as the current tool, a selected object can be deselected by
- selecting another object,
- pressing the enter key, or
- clicking on an area where there are no objects to select.
The object selected with the selection tool can be moved, edited, or deleted.
To effectively manipulate objects, note the following:
- An object is automatically selected when it is created.
- Any object can be selected with the selection tool by clicking on the object.
- Control points are found in all selected objects. They characterize
the selected object and denote its limits.
- For formulas, text, and boxes, control points denote an object’s
four corner points and four edge midpoints.
- For arrows, control points denote the arrow’s starting (source)
and ending (destination) points.
- Unselected objects do not display any control points.
- Control points are also used for resizing and/or re-orienting objects.
- For formulas, text, and boxes, a corner point
controls its two adjacent edges, while an edge midpoint controls
just the one immediate edge.
- For arrows, control points lets you change the endpoints of the arrow, thus
changing the arrow’s length and orientation.
- To use a control point first place the cursor directly above the control point
(the cursor will change into a small triangle pointer) and then drag the control
point to its new position.
- Objects are stacked in layers. Objects in upper layers can occlude those in lower layers.
- To quickly bring a selected object up to the top layer,
press the up arrow key once; to quickly bring a selected object down to
the bottom layer, press the down arrow key once.
- To fit an object into a specific layer in-between the topmost and bottommost
layers, move away objects at layers higher than the
desired layer, then put the special object on top, then replace any moved
objects back.
- When you want to move an object ensure that it is selected first,
place the cursor over the object but away from any control points, and
then drag the object to its new location. Dragging is possible when
the cursor appears as an open (grabbing) hand.
- To delete an object, ensure that it is selected first and
then press the del or Backspace key once.
C.2 Arrow Tools
The arrow tool is for drawing lines, single-headed arrows, and/or double-headed arrows.
It is the arrow button in the draw buddy and the page buddy.
To insert an arrow, first ensure that the arrow button
in the draw buddy or page buddy is pressed down.
Bring the mouse to the desired starting point (the source) of the arrow, press and hold down
the mouse button dragging the mouse to the desired ending point (the destination)
of the arrow. Release the mouse button once the final position is correct.
To resize, re-orient, move, or delete an arrow, refer back to
the selection tool manual section.
To customize the appearance of lines and arrows, use the arrow tools. Figure C.1,
which follows, shows the arrow tools floating window:
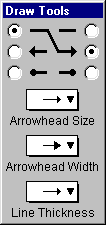
Figure C.1: Arrow tools floating window
Source radio buttons are in the leftmost column; destination radio buttons are in the rightmost.
To select the source point appearance click one of the source radio buttons.
To select the destination point appearance click one of the destination radio buttons.
- Arrowhead Size pop-up menu
Click on this pop-up menu to open the arrowhead
size menu and select a desired size. Different sizes have
the same proportion between width and length. The selected size applies to
both source and destination ends.
- Arrowhead Width pop-up menu
Click on this pop-up menu to access the
width pop-up menu, to select a desired width. Different width have
the same length. The selected width applies to both source and destination ends.
- Line Thickness pop-up menu
Click on this pop-up menu to access the thickness
pop-up list, to select a desired thickness. The selected thickness
applies to the source, the line, as well as the destination.
C.3 Formula Tool
The Formula tool is for writing formatted mathematical formulas in graph views or pages.
It is the “
x2” button in the draw buddy and the page buddy.
To insert a formula, first ensure that the formula button
in the draw buddy or page buddy is pressed down.
Click the mouse once at the center of where the formula is desired,
an easy button floating window will appear to provide help in formula entry,
and the formula can be entered.
To resize, move, or delete a formula, refer to
the selection tool manual section presented earlier.
To customize the appearance of formulas, use formula tools as presented in
figure C.2 and explained following:
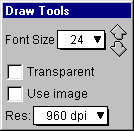
Figure C.2: Formula Tools Floating Window
- Font Size pop-up menu and finetune arrows
Click on the pop-up menu to open the font size list and select a desired size.
Each click on the finetune up arrow increases the font size by 1;
each click on the finetune down arrow reduces it by 1.
- Transparent background checkbox
Select this option to use a transparent background for the formula box.
De-select it to use an opaque white background.
- Use bitmap checkbox
Select this option to use bitmap font.
- Resolution pop-up menu
Click on this pop-up menu to open the resolution menu and select a desired resolution.
| Hint: | The size of the formula box is determined by the length of the formula and the
font size selected. |
|
C.4 Text Tool
The text tool is for writing text in graph views or pages.
It is the “A” button in the draw buddy and the page buddy.
To insert a text object, first ensure that the text button
in the draw buddy or page buddy is pressed down.
Click the mouse once at the center of where the text is desired,
A text editing window, as seen in figure C.3, will appear automatically for
entering text contents:
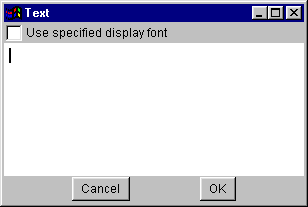
Figure C.3: A Text Editing Window
- The text region is for entering and displaying the text.
- The Cancel button is for aborting text writing, closing the text editing window.
- The Ok button for is completing text editing, closing the text editing window,
and inserting the text to the graph view or page.
To resize, move, or delete a text object, refer to
the selection tool manual section presented earlier.
To customize the appearance of text objects, use text tools as presented in
figure C.4 and explained following:
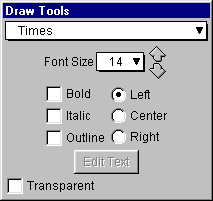
Figure C.4: Text Tools Floating Window
- Font type pop-up menu
Click on this pop-up menu to open the font type list and select a desired font.
- Font Size pop-up menu and finetune arrows
Click on this pop-up menu to open the font size menu and select a desired size.
Each click on the finetune up arrow increases the font size by 1;
each click on the finetune down arrow reduces it by 1.
- Text format checkboxes for
Bold, Italic, and Outline fonts
For each of the three text format settings, click to toggle between the selected
and unselected states.
- Text alignment radio buttons for
Left, Center, and Right alignment
Select one of the three options by clicking its radio button.
- Edit Text button
Click on this edit button to return to the text editing
window, to change the text contents. This button is greyed out (inactive) when the text
tool is first accessed and a text object has not yet been inserted.
- Transparent background checkbox
Select this option to use a transparent background for the text box.
De-select it to use an opaque white background.
| Hint: | The size of the text box is determined by the length of the text and the
font size selected. |
|
C.5 Box Tools
The box tool is for drawing rectangle boxes in graph views or pages.
It is the rectangle box button in the draw buddy and the page buddy.
To insert a box object, first ensure that the box button
in the draw buddy or page buddy is pressed down.
Bring the mouse to one corner of the desired box,
press and hold down the mouse button while dragging the mouse to
the opposite corner of the box.
Release the mouse button once the final position is correct.
To resize, move, or delete a box object, refer to
the selection tool manual section presented earlier.
To customize the appearance of boxes, use box tools as presented in
figure C.5 and explained following:
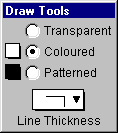
Figure C.5: Box Tools Floating Window
- Box background radio buttons for
Transparent, Colour, and Pattern background
Select one of the three options by clicking its radio button.
- If the colour option is selected, the background colour is to be selected
with the colour pop-up menu adjacent to the Colour radio button.
- If the pattern option is selected, the background pattern is to be selected
with the pattern pop-up menu adjacent to the Pattern radio button.
- Line Thickness pop-up menu
Click on this pop-up menu to open the line thickness menu and select a desired
thinkness for the border of the box.


