A Easy Buttons
This appendix explains how to enter functions, relations, values, and symbols with
GrafEq’s easy buttons. For explanation of specific functions and relations,
refer to the Appendix B, Functions and Relations.
Functions, relations, and operations have to be
entered in certain formats; they also take varying number of arguments.
GrafEq provides
the easy buttons as well as the following features to offer support during relation entry:
- Most entries are mathematically intuitive,
- The active constraint field being edited provides hints at the bottom of
the field prompting for the next step of action.
- The correctness of any entry can be observed in
- the relation visual format,
- the relation tree structure, and
- the relation graph.
A.1 Algebra Easy Buttons
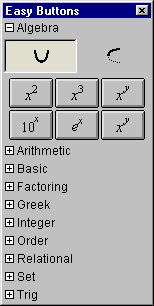
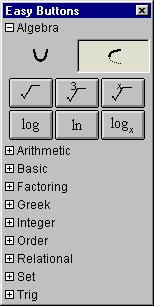
The Algebra easy buttons provides help for entering algebraic functions.
The two control buttons on the top row offer options for
algebraic power functions, or inverse algebraic power functions.
Figure A.1 shows the algebraic easy buttons:
 |
 |
| Power Functions |
Inverse Power Functions |
|
Figure A.1: Algebra Easy Buttons
The entities x and y within the easy buttons represent
expressions that should be entered after the button-click;
and the entity a represents arguments that should be entered prior
to the button-click. Each button is explained as follows:
- To enter a2, and a3 functions, enter an
argument first; then click the button;
- To enter 10x, and ex functions,
click the button first; then enter the power expression (represented by x).
For example, to enter “e33.54”,
- click the ex button;
- enter the power expression (represented by x), which is “33.54”
in this example.
| Hint: | Parentheses would be necessary for power expressions such as x/y, or 2xy,
but not if the power is a single simple term.
Experiment with GrafEq to see the differences when these power expressions
are entered with, and without parentheses. |
|
- To enter ax functions, enter the argument first; then
click the button; then enter the power term (represented by x).
For example, to enter “x2+y3=52xy”,
- enter “x”;
- click the a2 button;
- enter “+y”;
- click the a3 button;
- enter “=5”;
- click the ax button; and
- enter the expression “(2xy)”.
| Hint: | The same parenthesis rules apply to ax, 10x, and
ex, which means that parentheses are necessary for power expressions
such as x/y, or 2xy,
but not for single simple terms. Experiment! |
|
- To enter square-root, log, and ln functions,
click the button first; then enter an argument, which can be
a single simple term or an expression enclosed in appropriate parenthesis.
- To enter cube-root functions,
click the button first; then enter the argument and
finish with a closing parenthesis.
- To enter xth-rooty functions,
click the button first; then enter the
root index expression (represented by x) follow by
a comma; then enter an argument expression (represented by y); and
finally finish with a closing parenthesis.
For example, to enter “5th root of 2x+y”,
- click the xth-rooty button;
- enter the root index expression represented by x, which is “5” in this
example,
- follow by a comma;
- enter the argument expression represented by y, which is “2x+y” in this
example,
- finish with a closing parenthesis.
- To enter logxy functions, click the button first; then enter an
expression for the log base (represented by x); followed by
the argument expression (represented by y).
For example, to enter “log2x”,
- click the logxy button;
- enter the logarithm base represented by x, which is “2” in this example;
- enter the argument represented by y, which is “x” in this
example.
| Hint: | Parentheses are not required if the base and the argument are single
simple terms or fractions of single simple terms, such as x, y, x/y, 2, 3, or 2/3.
Parentheses are necessary for expressions such as x+y, 2xy, or for
two consecutive numeric terms that would otherwise be treated as one number.
Try it out!! |
|
| Hint: | In general, exiting exponent, radical, or logarithmic base is
by entering an operation of lower precedence; or if the constraint specification
is already complete, by pressing
enter, or pressing the tab key
to enter the next constraint field.
More information about precedence is available in
Appendix B, Functions and Relations. |
|
A.2 Arithmetic Easy Buttons
The Arithmetic easy buttons, as seen in figure A.2, provides help for
entering arithmetic operators.
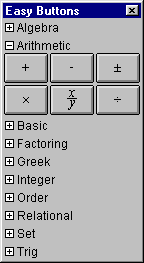
Figure A.2: Arithmetic Easy Buttons
To enter or insert an arithmetic operator, just click its button.
*, -, and / are all used in between two arguments (infix binary);
+, -, ± can be used either in between two arguments, or in front of one argument
(prefix unary). Each argument can be a single term or an expression
enclosed in appropriate parentheses).
A.3 Basic Easy Buttons
The Basic easy buttons, as seen in figure A.3, include six basic mathematical
operations and symbols which are frequently used.
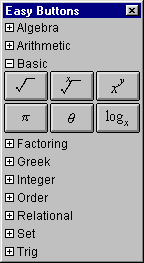
Figure A.3: Basic Easy Buttons
Basic easy buttons are also provided in the respective easy button groups to which they
logically belong. Explanation of how to enter relevant relations with the buttons are
presented again as follows:
- To enter ax functions, enter the argument first; then
click the button; then enter the power term (represented by x).
For example, to enter “52xy”,
- enter “5”;
- click the ax button; and
- enter the expression “(2xy)”.
| Hint: | Parentheses are necessary for power expressions such as x/y, or 2xy,
but not for single simple terms. When in doubt, parenthesis can always be used. |
|
- To enter square-root functions,
click the button first; then enter an argument, which can be
a single simple term or an expression enclosed in appropriate parenthesis.
- To enter xth-rooty functions,
click the button first; then enter the
root index expression (represented by x) follow by
a comma; then enter an argument expression (represented by y); and
finally finish with a closing parenthesis.
For example, to enter “5th root of 2x+y”,
- click the xth-rooty button;
- enter the root index expression represented by x, which is “5” in this
example,
- follow by a comma;
- enter the argument expression represented by y, which is “2x+y” in this
example,
- finish with a closing parenthesis.
- To enter logxy functions, click the button first; then enter an
expression for the log base (represented by x); followed by
the argument expression (represented by y).
For example, to enter “log2x”,
- click the logxy button;
- enter the logarithm base represented by x, which is “2” in this example;
- enter the argument represented by y, which is “x” in this
example.
| Hint: | Parentheses are not required if the base and the argument are single
simple terms or fractions of single simple terms, such as x, y, x/y, 2, 3, or 2/3.
Parentheses are necessary for expressions such as x+y, 2xy, or for
two consecutive numeric terms that would otherwise be treated as one number.
Again, when in doubt, parenthesis can always be used. |
|
- To enter or insert π and θ, click the its button.
A.4 Factoring Easy Buttons
The Factoring easy buttons, as seen in figure A.4, provides help for
entering factoring functions and operators.
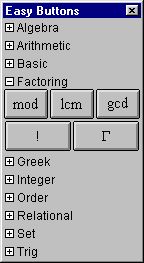
Figure A.4: Factoring Easy Buttons
- To enter mod, lcm,
gcd, and gamma
functions, click the button, then enter arguments.
gamma takes one argument, which can be a
single term or an expression enclosed in appropriate parentheses.
mod takes two arguments while lcm and gcd takes two or more,
each separated by a comma, and the last one followed by a closing parenthesis.
- To enter ! functions, enter an argument first, then click the button.
The single argument can be a single term or an expression enclosed in appropriate parentheses.
A.5 Greek Easy Buttons
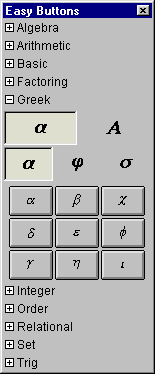
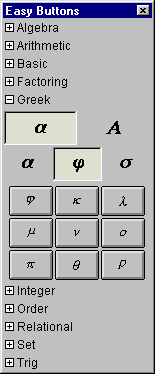
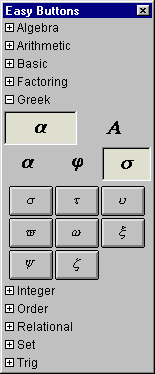
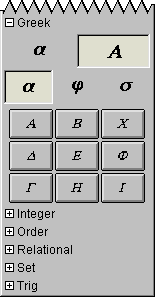
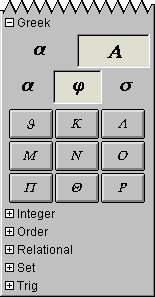
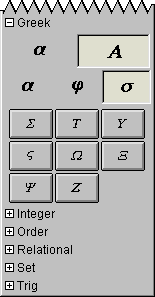
The Greek easy buttons provides help for entering Greek characters.
The two control buttons on the top row offer options for upper or lower case Greek characters.
The three control buttons on the second row offer options for
characters groups denoted by the leading characters, namely:
set Α(from Α to Ι), set ϑ(from ϑ to Ρ), or,
set Σ(from Σ to Ζ); and
set α(from α to ι), set ϕ(from ϕ to ρ), or,
set σ(from σ to ζ).
To enter or insert a greek character, just click its button.
Figure A.5 shows the Greek easy buttons:
 |
 |
 |
| Set α |
Set ϕ |
Set σ |
|
 |
 |
 |
| Set Α |
Set ϑ |
Set Σ |
|
Figure A.5: Greek Easy Buttons - Lower and Uppercase Characters
A.6 Integer Easy Buttons
The integer easy buttons, as seen in figure A.6, provides help for
entering integer functions and operators.
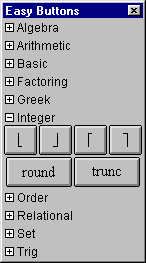
Figure A.6: Integer Easy Buttons
- To enter floor and ceiling functions, click the opening button,
then enter the argument, then click the closing button.
The single argument can be a single term or an expression enclosed in appropriate parentheses.
- To enter round, and trunc functions,
click the button first, then enter an arguments.
The single argument can be a single term or an expression enclosed in appropriate parentheses.
A.7 Measure Easy Buttons
The Measure easy buttons, as seen in figure A.7, provides help for
entering magnitude operators.
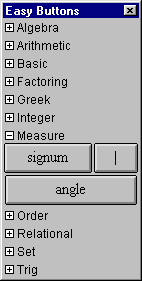
Figure A.7: Measure Easy Buttons
- To enter |x| functions, click the button first, then enter an argument,
which can be a
single term or an expression enclosed in appropriate parentheses, then close
by clicking the button again.
- To enter signum, and angle functions,
click the button first, then enter an argument,
which can be a single term or an expression enclosed in appropriate parentheses.
A.8 Numbers Easy Buttons
The Numbers easy buttons, as seen in figure A.8, provides help for
entering numeric digits, the decimal point, and the negative sign.
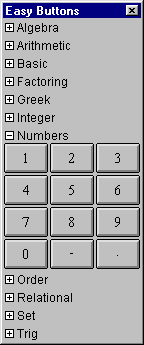
Figure A.8: Numbers Easy Buttons
To enter or insert a number digit, just click on its button.
Numbers can be conveniently entered via the computer keyboard; this easy button set is
provided for completeness, and is turned off in preferences settings by factory default.
A.9 Order Easy Buttons
The Order easy buttons, as seen in figure A.9, provides help for entering maximum
and minimum ordering functions:
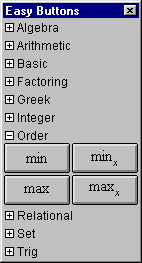
Figure A.9: Order Easy Buttons
- Click the ordering buttons first, then enter arguments.
- Min and max return the
minimum and maximum respectively, of specified arguments;
minx and maxx return the xth smallest and
the xth largest respectively, of specified arguments.
- To enter min and max functions, click the button first,
then enter two or more arguments,
separating any two by a comma, and finish with a closing parenthesis after the last argument.
- To enter minx and maxx functions,
- click the button first,
- enter a positive integer for the base x,
- start the argument list with an opening parenthesis,
- enter an appropriate number of arguments, separating any two by a comma,
- and finish with a closing parenthesis after the last argument.
| Hint: | The number of argument should be equal to or larger than the value of x. |
|
A.10 Relational Easy Buttons
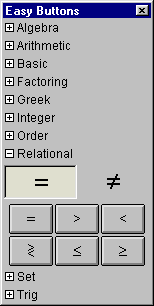
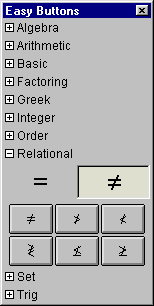
The Relational easy buttons provides help for entering relational symbols.
The two control buttons on the top row offer options for
simple relational symbols, or negated relational symbols.
Figure A.10 shows the relation easy buttons:
 |
 |
| Direct Relations |
Negated Relations |
|
Figure A.10: Relational Easy Buttons
To enter or insert a relational symbol, just click its button.
All relational symbols are used between two arguments (infix binary).
A.11 Roman Easy Buttons
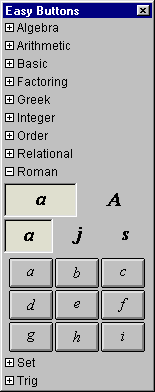
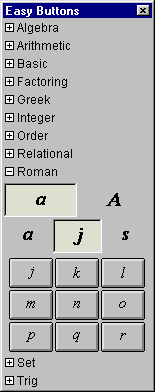
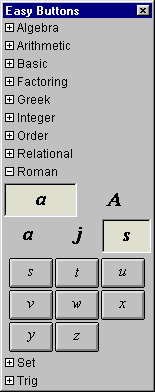
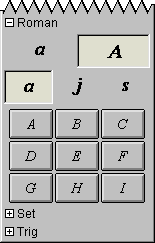
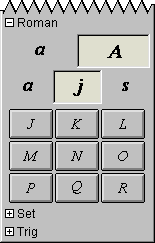
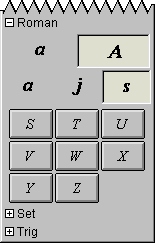
The Roman easy buttons provides help for entering Roman characters.
The two control buttons on the top row offer options for upper or lower case Roman characters.
The three control buttons on the second row offer options for
characters groups denoted by the leading characters, namely,
set A(from A to I), set J(from J to R), or, set S(from S to Z), and
set a(from a to i), set j(from j to r), or, set s(from s to z).
Figure A.11 shows the Roman easy buttons:
 |
 |
 |
| Set a |
Set j |
Set s |
|
 |
 |
 |
| Set A |
Set J |
Set S |
|
Figure A.11: Roman Easy Buttons - Lower and Uppercase Characters
To enter or insert a Roman character, just click its button.
Roman characters can be conveniently
entered via the computer keyboard; this easy button set is
provided for completeness, and is turned off in preferences settings by factory default.
A.12 Set (and conditional definition) Easy Buttons
These easy buttons, as seen in figure A.12, provides help for
entering set symbols and conditional definitions.
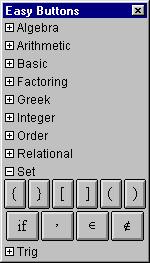
Figure A.12: Set Easy Buttons
- To define a set by listing its elements:
- click the open brace button (or enter the open brace from the keyboard),
- enter a set element;
if it is not the last element,
- click the comma button (or enter a comma from the keyboard),
- and enter the next element,
- and repeat the two above steps until the last element is entered.
- finish by clicking the close brace button (or enter the close brace from the keyboard).
- To enter set membership definitions, enter an argument first, click the
“is member” or “is not member” button, then enter the set definition.
- To enter conditional definitions,
- click the open brace button (or enter the open brace from the keyboard),
- enter terms and conditions as follows:
- enter a term,
- enter a space, then click the if button, then enter a space again,
- enter a condition term,
- and repeat the three steps above until all terms and conditions are entered.
- finish by clicking the close brace button (or enter the close brace from the keyboard).
An example conditional definition is
y={x if x>0, 0 if x=0, -x if x<0}
- Pairs of braces, brackets, and parentheses,
can all be used to control precedence. Just click pairs of opening
and closing buttons accordingly to insert them.
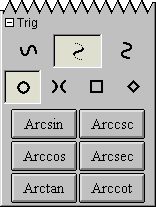
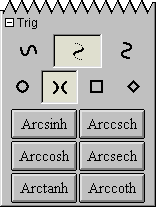
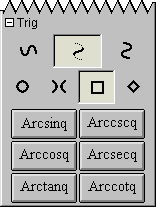
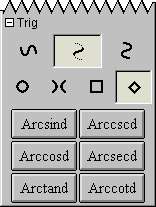
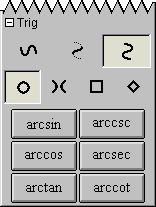
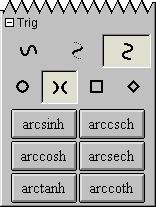
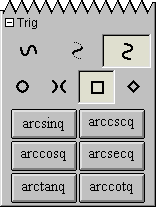
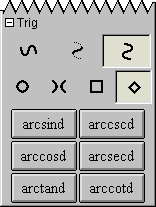
A.13 Trig Easy Buttons
The Trig easy buttons provides help for entering various trig functions and relations.
The three control buttons on the top row offer options for
simple trig functions, inverse trig functions, or inverse trig relations.
The four control buttons on the second row offer options for
operations groups based on four different conics, namely,
circle set,
hyperbola set,
square set, or
diamond sets.
Figure A.13 shows the trig easy buttons:
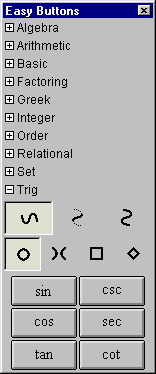 |
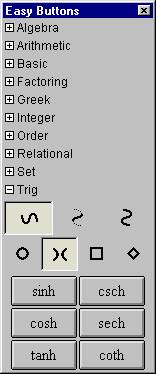 |
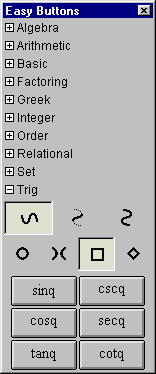 |
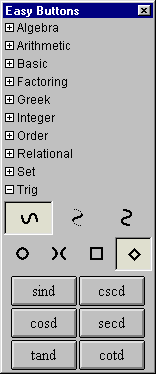 |
| Circle Functions |
Hyperbola Functions |
Square Functions |
Diamond Functions |
|
 |
 |
 |
 |
| Inverse |
Inverse |
Inverse |
Inverse |
| Circle Functions |
Hyperbola Functions |
Square Functions |
Diamond Functions |
|
 |
 |
 |
 |
| Inverse |
Inverse |
Inverse |
Inverse |
| Circle Relations |
Hyperbola Relations |
Square Relations |
Diamond Relations |
|
Figure A.13: Trig Easy Buttons
Each trig operation is used in front of one argument as each is a prefix unary operation.
To use one, click on the desired button first and then an the argument.
The argument can be a single simple term or an expression enclosed in parentheses.
Here are some additional hints and tips about the easy button floating window:
- All functions, operations and symbols may also be entered via the keyboard.
The key-combinations for special characters and operators are listed in
Appendix E, Keyboard Shortcuts.
- Easy buttons are provided in an easy button floating window.
The display of each group of easy buttons in the floating window can be toggled
on or off by clicking the
box adjacent to the corresponding set name.
- Easy button groups altogether with the respective headings can be hidden from
the easy button floating window, across sessions, by unselecting the respective
“Available” checkboxes from the File
Preferences
window - Algebraic Window - Easy Buttons - Access menu.
By factory default, all but Measure, Numbers, and Roman buttons are selected, but a
smaller selection may be appropriate for a beginners’ class or a special lesson.
For details of the floating window, refer to the The Easy Button Floating Window chapter.
- For details of the easy button floating window, refer to the The Easy Button Floating Window chapter.
|
|


