9 The Page Buddy Floating Window
The page buddy window is for accessing drawing tools and printing controls for
its associated page. It appears automatically when a page window is foremost.
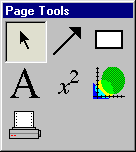
Figure 9.1 shows the page buddy floating window:

Figure 9.1: The page buddy floating window
The page buddy provides
- five general drawing tools—
- a selection tool, for selecting objects;
- an arrow tool, for drawing arrows and lines;
- a box tool, for drawing rectangular boxes;
- a text tool, for adding text annotations; and
- a formula tool, for adding formula annotations—
- a graph view tool, for adding graph views; and
- a printing tool, for selecting, configuring, and using a printer.
Before going into details about the different tools of the page buddy, following are
some hints about the floating window, its appearance, and some general use instructions:
- The page buddy floating window appears only when a page window is foremost.
It is otherwise hidden, but returns when a page window is activated.
- Each tool is accessed by clicking on a button in the
page buddy floating window. Controls and options for the selected tool are
presented in an associated, but separate, Draw Tools floating window.
- The selection tool on its own is not associated with any additional options, or
Draw Tools floating window; however, when an object is selected, the
Draw Tools floating window associated with the type of object currently selected
will appear to allow editing of the object.
- Following are some general use instructions for
options provided in Draw Tools floating windows:
- Selecting an option’s checkbox activates the option;
clicking on a checkbox or its name toggles between its
selected and unselected states;
- Clicking on a pop-up menu opens the pop-up menu,
so the desired option can be selected from it.
9.1 General Draw Tools
General draw tools provide many elaborate tools for augmenting pages for printing.
Details about each of them are explained in Appendix C, Draw Tools.
| Hint: | General draw tools in the page buddy is the same as those in the view buddy. |
|
9.2 Graph Tools
Graph tools are for pasting selected graph views onto a page.
Figure 9.2 shows the graph draw tool floating window:

Figure 9.2: The Graph Draw Tool Floating Window
The elements, from top to bottom in the graph draw tool floating window,
are explained as follows:
- View pop-up menu
- The view pop-up menu is for selecting a view to the clipboard, for subsequent
pasting to the page.
- Enforce Minimum Size checkbox
- The Enforce Minimum Size option is for imposing
a 25% limit for a pasted graph views’s minimum size.
If the option is not selected, pasted views can be shrunk arbitrarily small.
9.3 Print Tools
Print tools are for
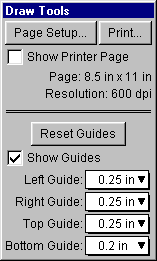
Figure 9.3 shows the print draw tool floating window:

Figure 9.3: Printer controls in a draw tool floating window
The elements, from top left across to bottom right in the print draw tool floating window,
are explained as follows:
- Page Setup button
- The Page Setup button is for accessing the operating system’s standard
page setup window. Options may include paper size, paper source and orientation,
graphic resolution, number of copies to be printed, and which printer to print to.
- Print button
- The Print button is for accessing the operating system standard
print window. The print window is for sending the current print
page to a printer; it may also include some options that influence the printing process.
- Show Printer Page checkbox
- The Show Printer Page option is for displaying of the limits that
the print head can reach on the physical paper.
- Page size and printer Resolution
- Page displays the print page dimensions in inches; Resolution
displays the resolution in dots-per-inch, “dpi”.
- Reset Guides button
- The Reset Guides button is for changing all margins back to the default setting.
Default margins are set to a minimum, and the guides would overlap with the
printer page.
- Show Guides checkbox
- The Show Guides option is for outlining, with dotted line,
the page area on which page contents are to be printed.
- Pop-up menus for Left, Right, Top and Bottom Guides
- The guide pop-up menus are for changing the respective print margins.
| Hint: | Margins can also be set by clicking at the respective guide box on the page, then
dragging it to the desired position. |
|
|
|


